Friday, December 9, 2016

Just to keep my hands busy

Normally when I see a chart pattern, I can imagine what the finished product will look like (with varying degrees of accuracy, it must be said).  So, when I found this intriguing chart on Pinterest and couldn't quite see how it might turn out, I simply had to give it a whirl.  Just for shits and giggles, you understand.  Turns out it was bloody gorgeous!
Irish crochet motif - experiment 1

I didn't have the tension quite right - I'd need to use a larger hook to stop the pineapples from buckling like they have here, or a finer thread - but I really like this.  I think a few of these motifs joined together would make a stunning top.  A project for when I'm at a loose end, perhaps!  I was thinking that certain elements, like the rosettes in the central parts of each point, could be picked out in a different colour to emphasise the pattern too.  Oooh, the possibilities ;)

Monday, August 22, 2016

Overlay crochet

Following on from some experimentation with freeforms and spirals, I had started to look into making shells and other freeform shapes.  I didn't get terribly far because I didn't want to waste the fairly expensive cotton I had.  I was also a bit disheartened by the limited colours available to me (both in my stash and in my yarn shop).  The upshot of that was a bit of a delay on progress with the freeforms.

Then, when I was on holidays in Spain, I found vast quantities of relatively cheap cotton crochet yarn in a plethora of bright and fun colours.  So I bought a load of it to be stashed in my luggage coming home.  Yeay!

My First Mandala
While still on hols, I got distracted from the freeform project.  I wanted to make some mandalas using the variety of colours I suddenly had available to me.  And then, what should appear only the whole concept of OVERLAY CROCHET!!! Where have you been all my life???

I discovered that there is a whole world of crochet-alongs (CALs) where people design and share patterns for different squares over a period of weeks and months to build up into huge pieces of crocheted art.  If you'll pardon the pun, I was hooked!

So, I would like to present my first effort at overlay crochet, a mandala based on Block 2 of Tatsiana at Lilla Bjorn Crochet's Circles of the Sun 2015 CAL.  This also nicely showcases several of the lovely shades of new cotton yarn I got.

Of course, I say 'based on', but it's more that I stopped a round or two early, to keep the mandala as a circle rather than turning into a square as part of the overall project.  Also, the bits that may slightly improvised are down to my inexperience with the technique, and not any sort of conscious adaptation on my part!  Thanks to Tatsiana and all the other designers and crocheters that share their designs, ideas, tutorials, skills, etc. and make it so easy for me to figure out what I want to do and then how to do it.

I'm not ditching the freeform project completely, but this technique is where my head is happy at the moment.  I think that I'll get some beautiful necklaces out of these too.

Friday, July 8, 2016

Wearable Circles (ii)

Finished circle
Following on from my original post about wearable circles in April, I finally finished the one for my sister and gave it to her.  She was delighted with it, which makes me happy :)
Here it is:
close up

It's a shame that the photos don't pick up on the silver thread running through it - there's a subtle sparkle whenever she moves and the light catches it.  All in all, I'm very pleased  with how this turned out.

wearing it
By way of reminder, here's a link to the pattern chart I followed for this.

I'm quite fascinated by how the same pattern can look so different depending on the colours used to make it up, even taking into account the different yarn types and hook sizes used.

Wednesday, June 1, 2016

Tunics'r'us

Elizabeth Tunic
When I was a teenager, which wasn't yesterday or the day before, there was a big trend for 'crochet tops'.  Basically, something lacy and gappy, worn over a fitted long-sleeved teeshirt.  You could wear it with jeans and boots to be all grungy, or a long floaty skirt to go for the bo-ho look.  I loved them.

So no wonder that some of my earliest wearables were lacy tunics like these.  Neither of them are quite the sort of thing that were my wardrobe staples in the 90s, but I love them all the same.

The blue one followed this pattern for the Elizabeth Tunic from Red Heart.  I always felt that I missed something on the pattern as the top seems slightly unfinished somehow.  I can't quite figure out what I did wrong though.

Hip Granny Tunic
I have mixed feelings abut the cream one, which followed this pattern for the Hip Granny Tunic, again from Red Heart.  The picture in the pattern was all funky, green and purple.  So why I chose to make it in cream cotton and ditch the sleeves, is not entirely clear to me.  Well, the sleeves were dropped because I'd run out of cotton and wanted to wear it before I had a chance to go back to my wool shop.  (Is anyone spotting a trend here???)  Despite my apparent unhappiness, I wear this top really often.  So, I can't be that unhappy with it really!

Anyway, both of these little jobbies were relatively challenging for me at the time and I was really proud of myself when I finished them.

Tuesday, May 10, 2016

More necklaces

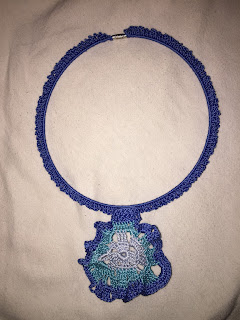
Blue Freeform necklace 
I made two more necklaces in the last few days.

The first was another freeform jobbie, graduating from pale blue, to aqua, to royal blue.  I wasn't sure if I liked how the freeform bit turned out though.  I think that maybe I need some more practice to be able to judge how better to make them.

For the blue necklace, I crocheted the base first: single crochets (sc) the whole way around the wire; then ch-3 and sl-st in every alternate sc back to the beginning.  Then I made the freeform bit using single (sc), double (dc), half trebles (htr), and treble crochet (tr) stitches as I felt the urge.  Plenty of chains and skipped stitches to create gaps and loops too.   I worked the freeform piece directly onto the ch-work of the base to secure it in place.

Purple spiral necklace
After that, I felt the need for something with a bit more structure for the second one and came across this deceptively simple spiral pattern.  (The only real complication arose from trying to keep myself untangled!)

This time I used pale blue, pale pink, purple, and cerise.  It also made sense to start with the spiral itself and then continue working in cerise to create the base of the necklace.  This secured the spiral in place without the need for sewing in.

Much as before, I worked a base of sc (from centre-point to end) and then 3-ch and sl-st in every alternate sc back to the centre.  There were a few extra sl-st on the last couple of 3-ch groups lining back up with the central spiral.  Then I continued on in sc to fill in the other side of the base (from centre-point to the other end).  3-ch and sl-st in every alternate sc back to the middle again and secure with some more well-placed sl-sts as I reached the centre.

I've been looking at some more freeform stuff online and there are some lovely how-to guides for shells that incorporate spirals and bullion stitches.  I might give some of those a go for the next batch!


Belated Mothers' Day

A while back, I acquired a set of fine steel crochet hooks.  So, naturally, I went looking for a suitable project to use them on and came across this doozy.  Then, off with me to buy the cotton thread for the job.  I tried a few of the craft and yarn shops but they'd never heard of the blending filament stuff on the materials list, so I just went ahead without it.
Calla Lilly brooch for Mothers' Day

My first foray into crocheting with steel hooks was surprisingly successful, in terms of the finished products.  I made two of these brooches: one for my mum and one for my mother-in-law, as presents for Mothers' Day.

They worked up pretty quickly: maybe a day or two each, although to be fair, I was going through an insomniac phase, so I was working on them until 4 or 5 in the morning.  They were incredibly fiddly though.  And for the first time in my life, I had to take my glasses off to be able to see up close... ah, the siren song of impending bifocals!!!

My poor fingers were the worse for wear for quite some time afterwards.  There must be a knack to dealing with those super fine hooks that doesn't involve stabbing yourself and splitting your fingers open repeatedly.  I've yet to figure it out.  In the meantime, lots of plasters and thimbles!

Tuesday, April 19, 2016

Wearable Circles

One of the things I love about crochet is that it can be so easy to make very intricate looking patterns.
first circular cardigan

 About a year ago, I made this circular cardigan for myself.  I chose this because I really liked the floaty and flared look of the picture on the source pattern.  I also had two large skeins of fine merino wool in these gorgeous autumn colours that were just waiting for the right project.  There should be sleeves on it too, but I ran out of yarn and then got lazy.  Still, it goes really well with lots of stuff and dresses up very simple outfits.

At the time, I'd never followed a crochet chart before and it took me a bit of time to get my head around this format.  I much prefer a chart to a written pattern now, so clearly I'm even more visual than I thought...

Anyway, I was getting heaps of compliments on this circular cardigan, not least because it looks very complicated.  (In truth, it was incredibly simple to make.  Naturally, I rarely admit that!)  I wore it to Christmas Dinner last year and my sister-in-law was super impressed that I'd made it myself.  So, I decided I'd make her one for her birthday.  Then my own sister got wind of that and insisted that I make one for her too, please!
circular cardigan for SIL

I decided that I'd try out a couple of different patterns this time.  For my sister-in-law, I chose a fine merino wool in a blue/purple combination and followed this pattern.  Again, I didn't bother with the sleeves.  Here is the finished product.

I'm still working on the one for my sister.  She's also a fan of autumnal colours, but brighter than my preference.  I found a lovely wool that goes through the colours of the rainbow, but with a kind of darker autumn tinge and has a silver thread running through it.

I had progressed quite far, following this pattern, but I decided that I didn't really like the granny square-ishness of how it was turning out, so I ripped it all back and started again.  I've gone back to the original pattern and I think that the colours are working really well with the open work.  I'm much happier with how this looks.  Here's a couple of work in progress pics so you can at least see the colours.  You can see that this wool  is chunkier than the other two, so I'll probably have to adapt the pattern to position the armholes.  I may even stretch to sleeves this time!

abandoned project
project in progress


Tuesday, April 5, 2016

No seam knitting

The bit I hate most about knitting is making up the garment once I've finished actually knitting all the pieces.  Maybe it's because my tension tends to be fairly loose and the seams end up looking quite holey.  Or it could be my inability to keep the end stitches even in size, so lining up the pieces properly can get a bit tricky.  I decided that I'd overcome this personal headwreck by using circular knitting needles.  Presto chango! No seams :D

Then my son asked me for a hooded cardigan, instead of a jumper.  So bang went my circular knitting plan.  But I figured that I'd try to make it in one piece, working back and forth along the circular needles instead of around.  I don't know if that's actually a thing or not, so I didn't bother looking for any patterns to tell me how to do it.  Instead, I took inspiration from regular cardigan patterns and basically stuck the instructions together in my head.  It was pretty easy until I got to the shaping bits for the sleeves and the front.  That got a little complicated, so I ended up making a chart in excel so that I could more easily keep track of the shaping.

I tried to do something clever to knit the shoulder seams together, but I couldn't quite figure out how to do what I was trying to do, so in the end I had to go old school and actually sew them together, but that was the only bit of seaming that I needed to do.  After that, I knit the sleeves in working from the top shoulder seam down, casting on directly into the arm hole, so again there was no need for separate sewing in.  I worked back and forth on the circular needles until I got from the top of the shoulder down to the join under the arm, then I was able to work the rest of the sleeve down in a single piece without any seams.  (I used a shorter circular needle for the sleeves than I did for the main body!)

Finally, I picked up the stitches around the neckline to work up the hood.  The last test of my patience was the request for a zipper up the front instead of buttons.  The whole point of this exercise was to avoid having to sew anything!  But nothing else would do him, so in went the zipper.  I was terrified that I'd mess up the tension along the zip and end up with either side of the cardigan puckering unevenly along the front.  I pinned the closed zipper in place to make sure that it was even and then sewed it in.  It wasn't quite as awful as I had anticipated.

Bearing in mind that I was not working off any actual pattern, and my son is at that awkward stage where he's too big for children's patterns, but not quite big enough for men's patterns, I was guessing the sizes and holding things up against him to see if they were long enough.  Clearly, I overestimated - or I've got the Irish mammy "He'll grow into it" syndrome - but he likes his sloppy cardigan.  He also likes that the hood makes him look like Emperor Palpatine.

Friday, April 1, 2016

A free form experiment

I decided to try out some free form crochet to make a necklace, which I gave to my sister for Christmas last year.  I was fairly pleased with my first attempt at this but I wasn't really sure if she liked it.  I was pretty excited when she wore it over to my house a couple of weeks ago and even more delighted when she told me that she's worn it out a few times and in work.  It gets lots of compliments too.

Obviously, there's no pattern because it's a free form but here's the gist of how I made it:
I got a wire necklace base and fastener thingie in my local craft shop (I have no idea what these things are actually called).  I used thick cotton thread in Red, Orange, and Yellow and a 1.5mm steel hook.  The trickiest bit was working single crochets (sc) the whole way along the length of the necklace wire.  It was insanely fiddly.  Once I got going with it, it did get easier though.  When I got to the end, I did 3-ch and then sl-st in every alternate sc back to the start.  This was fairly dense, but gave the base of the necklace a really pretty scalloped effect.

Next, was the free form bit, starting from the yellow in the centre and working my way to the outside, changing colours as I felt like it.  I did this with a random combination of single, double, and treble crochets to create an undulating pattern.  I also added in some chains of varying lengths and skipped a few stitches beneath to create the gaps in the pattern.  My main concern here was to make sure that the finished product was mainly flat.  I did get some flares by the time I got the the final round, but I liked how these looked so that was okay (they came out a bit like overlapping petals).  Then I used a combination of single crochets and slip stitches to firmly attach the free form piece to the front centre of the necklace triples.  Et voila!

I think I might make a few more of these as they are really quick and easy - I'd say no more than two evenings' worth of effort.  It'd be really simple to change up the combinations of colours and have a huge range of variations of this.  Next time, I think I'll make the centrepiece a little smaller and the second layer of colour a little stronger.  Still, I've got to say I'm very happy with how this little experiment turned out :)

Tuesday, January 19, 2016

Let's get this show on the road...

I haven't blogged anything in a long time. There hasn't been time. Or I haven't had anything to blog about. Or both. But now, I'm starting again - this time to share the bits and bobs that I make to keep my idle hands busy. My intention is to share pics of the things that I make - mostly with needles and yarn - and the details of how I made them. Until I get some pics of those things, this post is your lot. I wanted to make a start though...